Showing posts with label VSIX. Show all posts

Monday, April 15, 2024

MAUI App Accelerator - milestone of note

MAUI App Accelerator - 10,000 installs

In the last few days MAUI App Accelerator passed ten thousand "official" unique installs.

This doesn't include the almost eight thousand installs included via the MAUI Essentials extension pack. (Installs via an extension pack are installed in a different way, which means they aren't included in the individual extension install count.)

While big numbers are nice (and apparently worth celebrating) I'm more interested in how it's used.
The numbers for that are lower, but still noteworthy. 

It's currently used to create about 25 new apps each day. Which is nice.
I'm also trying to improve my ability to use App Insights so I can get other and better statistics too.


More updates are coming. Including the most potentially useful one...


Saturday, July 29, 2023

Why does writing XAML have to be so slow?

This article is a part of the .NET MAUI UI July calendar—a month-long list of content around .NET MAUI from the developer community, curated by Matt Goldman.


There are many potential criticisms of XAML. Some people want to abandon it entirely and just use C# to create their UIs. I think that introduces other issues (that I'll expand on in a future blog post), but it also doesn't do anything for the people who like working with XAML and/or already have a lot of it, and for whom completely rewriting that code isn't an option.

Rather than write XAML off, or sit and complain, I'm interested in different ways of writing XAML that address some of the criticisms and in providing tools to make it easier.

This post is about one such new tool. I was excited to try it out and have been impressed by the difference it's made to my coding (once I'd gotten used to working in a different way).

Firstly, two pieces of background:

1. About 20 years ago, I was involved in hiring a web developer. (Obviously, web development has changed massively since then, but this story is still relevant.) One of the people we interviewed was really keen on pointing out how they thought it was important that they wrote everything by hand and didn't use an IDE with any tooling that made writing code easier. I don't agree with this attitude, and that's probably part of the reason I still remember the conversation (especially given how bad at remembering other things.) Yes, it's great to have full knowledge of a topic and be able to do something without assistance, but that assistance may save valuable time. If you have someone with deep or expert knowledge, isn't it better to have them focus on the tasks that use that knowledge rather than simple tasks that could be automated or accelerated?

2. Reading one of the many threads about developer frustration with the lack of tooling for WinUI3, I was prompted to think again about the Toolbox inside Visual Studio. Someone was complaining that the Toolbox isn't populated for WinUI3 projects. Having not used a drag-and-drop interface designer for many years, I'd only really thought about the Toolbox as a place to store code snippets. What if it could be useful for writing code directly in the editor too?


This is the Toolbox window (initialized within a .NET MAUI project) - it has groups (Controls, Layouts, Cells, and General) and items within each group.

The Toolbox window showing groups and items

That it's also possible to add arbitrary pieces of code (AKA snippets) into the toolbox made me think about the other snippets that are supported by Visual Studio.

The Code Snippet Manager window filtered to the XAML Language

These two types of "snippets" got me thinking:

  • Snippets in the toolbox are visual (and so more easily discoverable) but limited in functionality.
  • "Code snippets" have more functionality but aren't visible/discoverable.

What if there was a way to combine the two?

Before I continue, I should probably point out something many developers aren't aware of. You can use the items in the Toolbox with the XAML editor? (or any editor window.)

  • You can drag an item onto the editor, and it will add the XAML for the control at the point where you drop the item.
  • If you double-click on an item and it will add that same XAML wherever the cursor is.

🤯

Give it a try:

Open a new .NET MAUI project and drag a Button onto the editor. You'll see it adds the following:

<Button Text="" />

Or, double-click on the ListView and see it adds the following:

<ListView><ListView.ItemTemplate><DataTemplate></DataTemplate></ListView.ItemTemplate></ListView>

That's good, but it puts the cursor after the closing element. Not if you then want to add content to the DataTemplate.


Notice also that the items in the Toolbox don't include some of the things you're likely to use most in a .NET MAUI codebase. I suspect that this list is actually from the historic Xamarin.Forms functionality still in the underlying code base.


Perhaps I can do something "better"?


Introducing  Pro XAML Toolbox 

It's only one window, but here it is in dark and light themes.

Light and dark theme versions of the Pro XAML Toolbox inside Visual Studio

Ok, it doesn't look like much, but let me explain. [prefer to watch rather than read? - see this video]

It's an intended replacement for the built-in Toolbox when it comes to working with XAML in a .NET MAUI project.

The main goal is to get boilerplate code written faster. This can then be modified as necessary for the requirements of an individual app.


Boilerplate code is often challenging to work with, and different approaches are taken to remove or work around it. I'm not able to change the language, so it's not needed, and for XAML, there isn't an easy way to use code generation or compiler trickery to make it unnecessary. So, I've chosen to try and make it so that there's less need to type it yourself.


Let's look at a couple of examples.

Example 1 - A login screen

Imagine you wanted to create a login screen like this: It has an image at the top, two input fields for the username and password (each with a label above), one button to "sign in", and one for if the person has forgotten their password.

mockup of a login screen, showing: image placeholder, 2 labels followed by text fields and 2 buttons

If you're familiar with .NET MAUI and writing XAML this probably doesn't look too complicated to implement. You're right. It shouldn't be hard to implement this. You could create this quite quickly and without too much thought.

However, it's even easier and faster to create the basic scaffolding of this UI with the Pro XAML Toolbox.

All you need to do is set the cursor in the editor and then double-click on the appropriate items in turn.

That's: VerticalStackLayout > Image > Label > Entry > Label > Entry > HorizontalStackLayout > Button > Button

So, nine items double-clicked, and it produces all this code (here shown formatted):

<VerticalStackLayout>
  <Image Source="PATH-TO-IMAGE" />
  <Label SemanticProperties.HeadingLevel="Level1" Text="CHANGEME" />
  <Entry Placeholder="CHANGEME" Text="{Binding PropertyName}" />
  <Label SemanticProperties.HeadingLevel="Level1" Text="CHANGEME" />
  <Entry Placeholder="CHANGEME" Text="{Binding PropertyName}" />
  <HorizontalStackLayout>
    <Button
        Command="{Binding CommandName}"
        SemanticProperties.Hint="Add a description of what happens when clicked"
        Text="click me" />
    <Button
        Command="{Binding CommandName}"
        SemanticProperties.Hint="Add a description of what happens when clicked"
        Text="click me" />

  </HorizontalStackLayout>
</VerticalStackLayout>


If I started to create this myself and only used the keyboard, 9 keystrokes gest me this much code:

<VerticalStackLayout>
    <Image Source=""
</VerticalStackLayout>

I've clearly saved a lot of keystrokes and, therefore, time. Also, possibly, a bit of mental effort too.

It's not just the amount of code I've gained. I did it all without having to move the cursor. When I added an element likely to have child elements, the cursor was automatically positioned accordingly.

I've also got attributes for the properties I'm likely to need to set, and there are suitable default values with prompts to change them too.


Example 2 - A list with an item template

Here's another common scenario. We want a templated list, and each item in the list should contain an image with two pieces of related text beside it.

A placeholder mockup of a list. Each item in the list has an image with two pieces of text beside it

Again this is very simple to create yourself, but you shouldn't have to write it all by hand.

Let's set the cursor in the desired position and double-click some items in the Pro XAML Toolbox.

CollectionView > Grid > Image > VerticalStackLayout > Label > Label

That's six items that we've double-clicked, and it's provided all this code (again, line breaks and formatting have been added):

<CollectionView
  ItemsSource="{Binding PropertyName}"
  SelectionChangedCommand="{Binding CommandName}"
  SelectionMode="Single">
  <CollectionView.ItemTemplate>
    <DataTemplate>
      <Grid ColumnDefinitions="*,*" RowDefinitions="Auto,Auto,*">
        <Image Source="PATH-TO-IMAGE" />
        <VerticalStackLayout>
          <Label SemanticProperties.HeadingLevel="Level1" Text="CHANGEME" />
          <Label SemanticProperties.HeadingLevel="Level1" Text="CHANGEME" />
        </VerticalStackLayout>
      </Grid>
    </DataTemplate>
   </CollectionView.ItemTemplate>
  <CollectionView.EmptyView>
    <ContentView>
      <StackLayout HorizontalOptions="CenterAndExpand" VerticalOptions="CenterAndExpand">
        <Label Text="Nothing to see here." />
      </StackLayout>
    </ContentView>
  </CollectionView.EmptyView>
</CollectionView>

Notice how the Grid is automatically put inside the DataTemplate and the Image inside the Grid.

I tried to type the above by hand and got this far with 6 keystrokes:

<CollectionView I

Intellisense helped a bit, but that's as far as I got. :(


But, you might point out, the generated code isn't finished!

No, but it is ready for you to make the specific tweaks you need. This could be removing the RowDefinitions from the Grid and specifying the Column that the VerticalStackLayout should be in. Both of which are trivial. And then you'll need to replace the placeholder text, but again that's easy. Yes, easier than typing the whole thing yourself


Your value is in producing finished software that provides value to those who use it.
Your value is not in the number of keystrokes you make or the amount of code you write.


Options/Configuration

But what if the generated code shown above isn't to your liking or preference? - You can configure it.

close up of the available options

Prefer to use events rather than commands? It's an option.
Don't want to include common (or recommended) accessibility/semantic properties? You don't have to.
Want every element to have an 'x:Name'? You can.

And the options to change these while you work are always accessible (not hidden away in a separate place), so you can easily and quickly change them while working on a file.


If (and when) there's some magical tooling (AI?) that can automatically give you everything you need to create a desired UI, then great. I'll happily use it.

For now, and until then, we can write code and build software much faster by using tools that do the easy, generic, and standardizable bits for us.


No, it's not the same as having a visual designer (something I know many people want, but Microsoft aren't likely to provide any time soon), but it's much faster than writing all that code by hand!


My hope is that others will find this useful too.

  • It's not a panacea or a silver bullet.
  • You don't have to use it.
  • It's not perfect for everything - I still write XAML by hand as well as using this.
  • It doesn't remove the need for other tools. (I have other tools to generate code in different ways)
  • But it could be another tool in your (pardon the pun) toolbox to help you create high-quality software faster and more easily.


Please install it, try it out, and let me know your thoughts.

I've already created issues to track some of the things I'd like to add and would love for you to add your ideas too.

And yes, there is likely to be WinUI/UWP and WPF support coming soon if other people want it.


Saturday, April 29, 2023

Thank you ElektroStudio for helping spread the VB love

I've built more than a few Visual Studio extensions.

Most of them only work with C# code.

I'd like to support VB.Net in more of them, but other priorities get in the way.

Const Visualizer is one that hasn't had the love it could have. It's really useful in some instances, but I haven't found the time to address the things about it that niggle at me when I use it.

Given that I haven't found the time to add the C# related fixes I want, you'll not be surprised to hear that VB support wasn't high on my priority list.

So, when I was asked about adding VB support, I had to acknowledge that it was only going to happen if someone else contributed it. Thankfully, ElektroStudios did just that, and now version 2 is in the marketplace with C# & VB.Net support.

I know that many people still use VB every day and that some of you even look to me for advice and tools on building with it. I wish I had more time to focus on supporting it, but maybe if more people contribute some of the work, we can build better tools for VB development together.

Whatever happens, thank you, Elektro, for your contribution.


Thursday, March 16, 2023

Microsoft's Ability Summit has inspired me, again!

Microsoft Ability Summit March 8, 2023

Microsoft's Ability Summit was last week, and it has, once again, inspired me to do more work on the tools I have in progress.

You can register via the above link to get to the official site, but the videos are also now available on YouTube.


It was inspiring to see the recently announced Accessibility Checker inside Visual Studio in action. It also showed me that it does have value. I had doubts about this as it's functionality that already exists elsewhere. 

This new tool allows you to run the same tests as can be run by Accessibility Insights, but from a button in the in-app (debug) toolbar (or Live Visual Tree window.)

Two captures from Visual Studio. The left capture shows the top edge of an application being debugged including the in-app toolbar. The 7th button is the "Show Accessibility Checker" button, shows an accessibility icon in white and has a red circle around it. The right capture shows the top of the Live Visual Tree panel in Visual Studio. On the toolbar at the top of that panel, the 6th button is the "Scan for Accessibility Issues" button, has the same accessibility icon in blue and also has a red circle around it.

I've got in the habit of using Accessibility Insights directly or via automated testing* to perform basic testing of an application.

* Yes, I have tests that run an app, navigate to each page, run accessibility tests against that page, and check for (& report) failures. It's not perfect, but it's much better/faster/reliable than doing it manually. 


It reminded me that I have code that can do much of this on source code.

Like this:

Visual Studio Editor screenshot showing contrast issues and missing Name on XAML source code files

When the benefit of Visual Studio having an Integrated Accessibility Checker in the debug experience is that it makes issues easier for developers to see and fix because they don't have to go to another tool. And it makes them quicker and easier to fix by "shifting left" to be part of the debugging experience; how much better to shift further left to when the code is being written (before getting to the debugging step) and not putting the functionality behind another tool that must be known about and run but putting the information where developers are already looking?

I really must hurry up and get this in a state that I can make it public.

It's not as complete as the other tooling as it can't catch quite as many issues, but I think there's value in catching (and fixing) even some issues earlier. 


Monday, March 13, 2023

Please help improve the extensibility experience in Visual Studio

 Based on your solution, you might need to install extra components for a full development experience

Have you ever seen the above prompt (or something very like it) inside Visual Studio?

It's displayed when a solution is loaded that requires workloads or components that aren't currently installed.

Those requirements are specified inside a .vsconfig config file.

The idea is that VS will tell you if you haven't got the things the project owners/creators/maintainers have specified as necessary to work with a project installed.
You can then click on the "Install" text link, and it will install the things you are missing.


But what if you want to require (or recommend) that an extension is installed to work with the solution?

Well, then you're stuck. 

You're forced to include this in the documentation and hope that someone looks at them. Ideally when setting up their environment, or--more likely--when things aren't working as expected and they want to know why.


Obviously, this is far from ideal and can be a barrier (I think) to the creation of specific extensions to fill the gaps in individual projects. - I have had multiple discussions where custom extensions were ruled out because it is too difficult to get everyone working on the code base to install the extensions. We ended up with sub-standard solutions requiring documentation ad custom scripts. :(


Wouldn't it be great if the existing infrastructure for detecting missing components could be extended to detect missing extensions too?


Well, it's currently under consideration. Maybe you've got a moment to help highlight the need for this by giving the suggestion an upvote. 👍

Thank you, please. :)


Monday, January 30, 2023

MAUI App Accelerator version 1.2 is now available - What's new?

Version 1.2 adds:

  • 1 new Navigation Style: None (No Shell)
  • 4 new pages: Map, NavigationPage, TabbedPage, & FlyoutPage
  • 7 new features: FontAwesome, sqlite-net-pcl, AppCenter, Sentry.io, InAppBilling, StoreReview, & Audio
  • Use of the newest versions of NuGet packages.
  • Support OS-level Text Sizes in the wizard (for improved accessibility.
  • Some bug fixes
  • Improved testing (although you'll never see that)
  • Images of new sponsors - a big thank you to all of them
  • Support for all the sponsor images when the wizard is too small. 

Let me break that down.


New Navigation Style: "None"

Don't want to use Shell? - Now you have that option.

Wizard showing the "None" option for "Navigation Style"

New Pages:

If you're targeting .NET 7.0 you can now create a page with a map on it (and the relevant package referenced and configured in the app Builder.)

This means you can easily create the following on Android & iOS.

But not on Windows--because it doesn't (yet?) have a native map control. :(


If you're not using Shell, you may also want to use one of the page types that aren't supported by Shell. Now you can:

FlyoutPage, NavigationPage, & TabbedPage options in the wizard

New Features:

There are lots of new features that have been added.

The "Add Features" step in teh wizard showing all the newly added options.

Most of these add references/files and do essential configuration. 

Hopefully, this provides an idea of what's possible and hints at where I'd like to go with this in the future.

If it gives you ideas for what you want to see added to this list, please create a suitable issue.


Updated NuGet package references:

I find it very disappointing when you create a new project, and the first thing you need to do is update all the referenced NuGet packages to pick up the latest features, fixes, and security patches.

Well, not here. Everything 


Support for OS-level text sizing:

In the past, if someone had configured Windows to make text larger, like this:

Partial screenshot of the "Make text bigger" option in the "ease of access" or accessibility settings
Then the wizard could end up looking "less than ideal." All the buttons are at least accessible, even if you can't read all the text.

Wizard not coping with resized text

Most of this UI had come from Windows Template Studio and had design and accessibility reviews by the Visual Studio team. I was surprised this was an issue.

But, now it's not:

The updated wizard that adjusts to increased text sizes

This isn't something I've ever considered previously. For the most part, addressing the issues was easy, but some things were harder than I would have hoped. This includes testing the related changes. I guess that part of the reason this hasn't been noticed before is that there are no automated testing tools for verifying this behavior, and to manually test requires changing an OS setting. Hopefully, this will change in the future.


New sponsor images & Improved handling of so many sponsor images:

Having a lot of people sponsor me via GitHub is a lovely thing. In appreciation of this, I tell them how to remove the prompt to become a sponsor that is shown in some extensions. And if their sponsorship isn't private, I add their avatar to the bottom of the wizard.

Like this:

Sponsor avatar images

However, when the wizard is made smaller, some of those images are obscured.


Hey, I'm not complaining. This is a nice problem to have, and I want to respect all my sponsors, not just those displayed on the leftmost edge of the screen.

So, now this happens when the screen gets smaller:

Yes, I have wasted several minutes watching as things overlap when the available space is reduced.


Please download version 1.2, try it, and tell me what you think. (If it's good, leave a review on the marketplace so others can see it too.)

Then, if you have suggestions for other things I can add, head over to the GitHub repo and create, upvote, or comment on a suitable issue.


Wednesday, November 23, 2022

MAUI App Accelerator v1.1 - Now with C# Markup support

Version 1.1 of MAUI App Accelerator is now available from the Visual Studio Marketplace.

The big change in this version is the inclusion of C# Markup as a 'Coding Style'.

Partial wizard screenshot showing all three Coding Style options

This adds a way of creating the UI entirely in C# and with no XAML.
Ok, that should probably come with a small asterisk, as the generated apps still include XAML files which define the default control styles. I'm not sure if this is the best way to go. Looking at various public projects, it seems there is mixed opinion on doing this. If you have thoughts on what MAA should do, I have an issue open on GitHub where I'd love your feedback

Exploring the creation of UI without using XAML has been an enlightening experience. It's caused me to think in new ways about creating the UI. It's also tied in with some of the thinking I've been doing recently about how to improve the way XAML is written.

The overarching thing I've seen when exploring creating UIs this way is that it's a technique that's still in its infancy. There's a lack of established patterns and "best practices." Lots of what I thought of as basic, core functionality is missing. There's a lack of consistency and conventions is how people create UIs this way. Also, lots of what I've seen seems to be based on ways of recreating in C# what would otherwise have been done in XAML. This seems to be missing out on some of the potential benefits of not using XAML. When writing C# to create a UI, I find I want to do things very differently from how I would in XAML, but I don't yet know if that would have any currently unforeseen consequences or be too hard for others to understand.
The UI code generated by MAA is still very simple. It's this way, so it's easy to remove (for those needing something different in their app) and understand for those who are learning--or want to know what can/can't/should/shouldn't be removed. 
I strongly suspect that people creating UIs with C# in a couple of years will be doing it differently from how I see it being done today.

I'll continue to watch the MAUI.Markup and CSharpForMarkup repositories, and hope to learn from them as more people start creating UIs this way.

Thursday, June 09, 2022

Plant trees while you search for error descriptions

 Ecosia logo

Ecosia is a search engine that uses some of the money they make from selling advertising to plant trees. You make a small change to your search behavior and they plant some trees. It's simple.

There's even an extension for Chrome to make it your default search engine. (You should install it 😉)

Under the hood it uses Bing to provide the search results, so you'll still get high-quality results. This isn't some random, small company trying to compete with Google on Search.


That all sounds good, but I've done a bad thing.

I've changed a default setting.

Shock. Horror!

For my Error Helper extension for Visual Studio, the default is now (as of v2.4) to search with Ecosia.

Changing default settings is something you should only do with great care and for very good reason as it can surprise, confuse, and frustrate the people using the software.


If you're not aware of my extension, it provides some additional options when you right-click on an entry in the Error List. The one of particular interest here is the option to easily search for the text of the error message. Sometimes, error messages don't give you all the information you need to address an issue and so it's necessary to ask the internet for help.

Screenshot showing the context menu options added by the extension

But I did it for a very good reason.

I wanted to help raise awareness of Ecosia, and in turn, help create a world with more trees in it.

This will help plant a few trees based on usage and people not even realizing anything's changed.

The impact on existing users of the extension will be minimal as it will continue using whatever they were using with the previous version. Even if that was the old default.


I'm just trying to do something to help other people make the world a slightly better place with minimal effort on their part.


Don't want this? That's ok, you can still configure the extension to use, Bing, Google, or StackOverflow as the search engine of choice.


If you're very upset by this, simply send me your receipt for your purchase of the extension and I'll give you a full refund. (Just kidding, the extension is free!)


Thursday, May 26, 2022

Testing against old versions of Visual Studio

[This is mostly for my own reference, so I can find the link again quickly in the future]

Partial screen shot of the Visual Studio Installer showing multiple versions installed on the same machine

If developing Visual Studio extensions, it can sometimes be useful (and necessary) to have different versions of Visual Studio installed.

Previously I achieved this by having preview and non-preview versions installed and being careful about how and when I updated them to newer versions.

However, I recently had to also test against a version older than I had installed on any of my machines.

Well, it seems the lovely people on the Visual Studio team already have this scenario covered.

It's possible to get older versions of VS that don't prompt for updates. This allows the installation of multiple versions on the same machine without having to worry about updating them.

Get them from:

https://docs.microsoft.com/en-us/visualstudio/releases/2022/release-history#fixed-version-bootstrappers


Wednesday, March 02, 2022

Are you still using Visual Studio 2017?

Visual Studio 2017 icon/logo

Are you still using Visual Studio 2017?

If so, what for?

Seriously, I want to know.

I ask because support for it officially ends next month! (12th April 2022) but I know that some users of my extensions are still using it.

If you are dependent upon any of my extensions continuing to work on VS2017 now or in the future, please reach out to find out how/if I can support you.

Or just update to VS2022.


For reference, there is more on support lifecycles in this post on the Visual Studio blog.


Friday, December 03, 2021

I'm updating (most of) my Visual Studio extensions to support VS022

screenshot showing a selection of my extensions in the VS marketplace

Visual Studio 2022 has a lot of changes and new features.

The biggest one for me is that most extensions that supported earlier versions are not 100% compatible with this new version.

This means creating a new version of each extension that I want to be available on both VS2019 and VS2022.

Due to the way that I'm creating new versions (I have my reasons), it's possible that you can install two different versions on VS2019.

Visual Studio 2019 'Manage Extensions' window showing duplicate installed entries

If you have multiple versions of an extension installed, you should uninstall the one that doesn't have "(2019)" at the end. If you're only using VS2022 then you won't see this.

For the most part, having both installed shouldn't be a problem but it might lead to some duplication of output or other strange behavior. I recommend you delete the older version. 

I haven't yet made VS2022 versions of all the extensions available yet. For the ones I haven't done yet, I have a (private) list for the order in which I will change them. Ones with more requests (especially from my GitHub sponsors) get top priority. Not all will be made available on VS2022 and some will take longer to do due to the complexities of migrating the code. If there's something you're curious about (want sooner), open an issue on the appropriate GitHub repository or send me a message.

I'm also using the process of reviewing and updating these extensions to add a prompt to try and encourage more of you to become a sponsor. Sponsor me any amount, either as a one-off on a recurring basis and I'll tell you how to make sure you never see this prompt again. Other sponsor benefits are planned for the future too. ;)

Example of the prompt requesting sponsorship

If you're curious, I might share how effective this is, but early feedback has been positive.


Monday, March 29, 2021

Here, I made a way to navigate between ANY files in Visual Studio

Being able to navigate between different parts of code is really useful. You simply hold down the ctrl key and click on an item, and you're taken to the definition of a method, or class, or whatever. Or, maybe you use a shortcut or context-menu entry to do the same. However you do it, it makes navigating a codebase much easier and saves untold time.

But what if you want to navigate between files that aren't all code, or in the same programming language?

Visual Studio doesn't support this, but don't worry, I can help. 

Introducing CommentLinks, a Visual Studio extension to enable links between any files from within the Visual Studio code editor.

the extension logo
The idea is simple. In your code, you put "link:" followed by a filename, and then a button (see below) is added that, when clicked, will take you to that file.

button shown next to the text "link:MapManager.js"
It will search for files anywhere in the solution. The file doesn't have to be in the same directory, project, or in any project. It just needs to be visible in the Solution Explorer.
If there are multiple files in the solution with the same name, you can specify the one to find by including the directory name(s) to be clearly unique. e.g.:

link:otherjs\device.js
or
link:otherjs/device.js (either directory separator)

Want more than simply opening a file?

You can open the file at a specific line by adding "#Lnn" (where nn is the line number) after the file name. e.g.:

Link:plainfile.txt#L33

You can open a file and search for specific text by including it after a colon (:) immediately after the filename. Or after "#:~:text=" to match the convention for text fragment anchors.

link:device.js#:~:text=Device.prototype.getInfo
link:device.js:addConstructor

And, it can handle spaces in the search text or filename by using percent-encoding (so a space character is replaced with "%20") or by putting them in quotes (single or double.) e.g.:

link:device.js:"getInfo = function ("
link:"device.js:getInfo = function ("
link:"name with spaces.js"
link:misc%20files/other%20device.js

You can navigate within the same file (to search for subsequent occurrences of text) by specifying the file's name and then the search text.

You can open any file on disk by specifying the full path. e.g.:

link:C:\Temp\TestFile.txt

You can even use it to run arbitrary commands by adding "run>" after "link:" This can be useful to open other applications, open files in their default application, or to run commands with custom schemes/protocols. e.g.:

link:run>cmd.exe
link:run>mockup.pdf  (assuming in the same directory)
link:run>ms-settings:easeofaccess-highcontrast

Don't want to use "link:" before the file name?
That's ok. You can change this to any text you want by going to Tools > Options > CommentLinks and changing the Trigger word.
partial screenshot of options dialog showing the trigger word setting


The name might be misleading. It doesn't just work with comments but anywhere in the code file. The name came from the original intention and the fact it was expected only to be used in comments. It works anywhere.


Get it from the marketplace and let me know what you think.

Want to see it in action? See this quick video I made previously showing some of the features.


This is part of a collection of Visual Studio extensions I have made. You can see them all at https://marketplace.visualstudio.com/publishers/MattLaceyLtd 


I originally created this at the suggestion of one of my GitHub sponsors. Not only am I really grateful to the people who sponsor me (the current ones and those who have sponsored me for a period of time in the past, but I also try and do things to help them.

I can't always build everything my sponsors want or need, but I'm inclined to help them more. 😉

This was built for a specific niche use-case, but other people have already found this extension and requested many of the features it has. It turns out that working with multiple file types in VS isn't something that everyone needs to do, but the people who have to do this are very disappointed with what comes in the box and are keen to see additional capabilities added.

One such person who wanted a new capability even paid for this to be added. They wanted a feature I wasn't sure about adding. I was going to suggest to them that this was the sort of thing I'd be more inclined to do for a sponsor, but before I could email them, they'd sent me some money. Not a lot but not a trivial amount. That feature was added quickly ;)

I'm still not entirely sure how I feel about someone giving me some money and then asking for a feature. Still, I didn't want to discourage someone enthusiastic about the project. I especially didn't want to discourage anyone willing to give money to an open-source project.

Based on the time required to implement and support the feature, it's less than I would charge for regular work at an hourly rate, but it was certainly appreciated.


Tuesday, February 02, 2021

Here, I made this to search StackOverflow for your error description

Another small update to an existing Visual Studio extension.

ErrorHelper allows you to work more easily with the descriptions on the Error List.

Context menu showing options for: Copy Description, Search Description, and Open Url
You can copy the description (not just the whole line--as is the default behavior).
If the description contains a URL you can open that directly.
And you can search the internet for the description (error) message.

The alternatives to using this extension is to manually type the error message or URL. Or you can copy the whole line (including all other columns) paste it somewhere and delete the bits you don't want, or copy (again) the bit that matters and paste that into a search box somewhere else instead.

I find right-clicking and then clicking on "Search Description" much faster and easier!

In today's update (v1.7), I added the ability to set the search engine as StackOverflow.

Configuration /Options window showing search options of: Bing, Google, and StackOverflow

Yes, searching in Bing or Google quite often takes you to StackOverflow. If you find that's the case for you, this option now cuts out the middle-man.

This improvement was from a suggestion I received on Twitter. If you have any other ideas for making this (or any other extension better) then feel free to tweet me a suggestion too. 

Here, I made a thing to save time building all projects in a solution

Compilers are complicated. They don't always behave the way you'd expect.

For instance, if you have a resource that has the Copy to Output Directory setting of Copy Always this can force a whole compilation even if nothing has changed!

I've never needed this but sometimes this is the default setting for some file types. As this can lead to me waiting while projects are being unnecessarily recompiled I previously created a Visual Studio extension to detect this and warn me so I can correct offending entries and save myself time.

"Copy Always" with a line through it

Today I've updated it so that it can be used from the context menu of the Solution entry in Visual Studio's Solution Explorer.

Just a little thing but I hope it will help at least one person.

 :)


Thursday, November 19, 2020

A festive introduction to Visual Studio Extensions

This article is part of Festive Tech Calendar 2020. An online event organized by the tech community with content created by many kind individuals around the world.


Visual Studio is highly extensible. This article will show you two simple ways to extend it by adding additional content to the editor. What you add is up to you. It could be something practical, or it could be something fun, like this:

Screenshot of Visual Studio editor with holly in the corners, and images of Santa, Christmas trees, and snowflakes among the text

While there are many festive images included in the above screenshot, they are added in two ways.

The holly and mistletoe are Viewport Adornments. The smaller images among the text are Intra-text Adornments.

This post has three parts.

  1. Instructions on how to create an extension that adds these festive adornments to the editor.
  2. Examples of how that knowledge can be used to create more practical extensions.
  3. A video showing how to modify or extend the festive editor code.

Creating a festive editor extension

The code for this extension can be found at https://github.com/mrlacey/FestiveEditor.

If you don't want the code but simply want to install it, you can download it from the marketplace.

Creating a project

To create an extension for Visual Studio, you must have the 'Visual Studio extension development' workload installed. This option is available when installing or modifying an installation of Visual Studio.

The Visual Studio Installer showing the extension development workload option

We'll start by creating an Empty VSIX Project within Visual Studio.

Empty VSIX Project option in the Create a new project dialog
Let's call this project FestiveEditor.

Adding a viewport adornment

The first things to add to the extension are the holly and mistletoe images.

I'm using images from SweetClipArt.com, but you could use any images you want.

mistletoe with red ribbon Holly with berries

For simplicity, I've created versions of the holly image rotated for each corner it will be displayed in. 
The images are in a folder called Images, and I've set the Include in VSIX property to True so that they'll be distributed with the extension.

partial screenshot showing images in solution explorer and the properties window

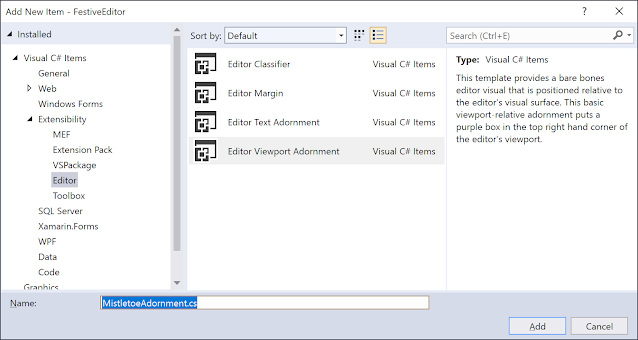
Firstly, we'll create an adornment that will display the mistletoe. We do this by adding an item to the project of the type Editor Viewport Adornment. Let's call it MistletoeAdornment.cs.

Add New Item dialog showing Editor Viewport Adornment option

This adds two files and several references to the project.

Solution Explorer showing new files and references

MistletoeAdornmentTextViewCreationListener.cs is responsible for the creation of the image (adornment) that we add to the editor. Because this class will create all of the adornments that we add, let's give it the more generic name of FestiveEditorTextViewCreationListener.

This file does three things.

  1. It determines which editors it applies to.
  2. It defines the visual layer to which the images will be added.
  3. It creates a class that displays the image.

Determining which editors the adornment applies to.

The class implements and exports the interface IWpfTextViewCreationListener. The ExportAttribute tells Visual Studio, via MEF (the Managed Extensibility Framework) that this class wants to listen to TextView creation events. By specifying the ContentType as "text" and the TextViewRole as PredefinedTextViewRoles.Document Visual Studio knows to add this to all editors that allow the editing of text documents.

Defining the visual layer that will host the images

The AdornmentLayerDefinition is a private field but is accessible within the extension as it is exported via MEF. By specifying the name of "FestiveAdornments," we will reference it in other classes. By specifying that it comes after the predefined Text layer, it will appear on top of all the content in the file/editor. The editor has three built-in layers: text, caret, and selection. If we wanted everything in the layer to appear under the editor's other contents, we could specify the Order as coming Before the Selection.

Creating the class that displays the image

The final part of this class is the implementation of the TextViewCreated method. Visual Studio calls this and passes a reference to the IWPFTextView interface. We'll pass this to the control that displays the mistletoe image.

Displaying the mistletoe image

The MistletoeAdornment class handles the creation and positioning of the mistletoe image.

When the class is created, it:

  • creates the BitmapImage class that will display the png file.
  • specifies which layer to add the adornment to.
  • subscribes to LayoutChanged events of the WpfTextView so that we can redraw it in the middle of the top of the screen whenever the window size changes.

If we debug the project, a new experimental instance of Visual Studio is opened with our extension installed. If you then open any document file, you will see the mistletoe added in the middle, at the top of the screen.

screenshot of Visual Studio showing the mistletoe adornment

Displaying the holly images

We now need to create four new classes to create the four holly image. We could use one class that creates and positions multiple images, but as the classes are so simple, I find it easier to debug and maintain them as separate classes.

We'll call these classes TopLeftHollyAdornment, TopRightHollyAdornment, BottomLeftHollyAdornment, and BottomRightHollyAdornment.

These classes can all be the same as MistletoAdornment.cs but with three differences:

  1. The fields containing the height and width with which to display the images.
  2. The name of the file used when creating the BitmapImage.
  3. The code to position the images.
The code for the positioning of the images is this.

The repetition in these classes makes them a suitable candidate for abstracting the commonality, but this is left as an exercise for you if you'd like to do this.  

We now need to tell the creation listener to create the new classes.

When this is debugged, we see all four images.

Visual Studio editor with holly in each corner and mistletoe at the top

Adding Intra-text adornments

We can now add additional images between some of the text in the editor.

We'll start by adding some images to the Images folder and again setting the Include in VSIX property to true.

Christmas treesanta facesnowflakesnowmanpresent

The aim is to put these images next to words of between three and seven characters in length.

The extensibility workload includes an item for creating an Editor Text Adornment. However, it is not suitable for the complexity of our scenario.

Instead, we'll take inspiration from one of the VSSDK Extensibility Samples.

Specifically, we'll reuse the IntraTextAdornmentTagger and RegexTagger classes.

Our code will use two taggers. A tag is a way of associating some data with a location (or span) in the text. A Tagger is responsible for creating tags.

We need the first tagger to look through the text to find places to add the images. It will use a regular expression to find those locations and so will be based on the RegexTagger class.

The second tagger will be responsible for drawing creating tags that show where to draw the image adornments. This will be based on the IntraTextAdornmentTagger class.

Tagging where to put the images

The first thing we need to do is to tell Visual Studio that we will provide an ITagger that will produce FestiveImageTags. This is done with the FestiveImageTaggerProvider.

Next, we need to define the FestiveImageTagger. Most of the work this class does is inherited from RegexTagger, but we need to specify the Regular Expression (Regex) to identify where we want to put the tags/images.

The final thing we need to create the tags is the tag definition itself. FestiveImageTag implements the ITag interface, but this is used purely for identification and does not contain any functionality. The only thing the tag needs is the "term" or word matched by the regular expression.

If we ran the code now, we wouldn't see anything. This is because (most) tags by themselves do not cause any UI to be displayed. (Notable exceptions to this are the OutliningRegionTag and the ErrorTag, but we are not using them here.)

Putting images where there are tags

As with creating the tagger earlier, we first need a provider to tell Visual Studio to create the tagger. FestiveImageAdornmentTaggerProvider tells Visual Studio that in text documents, it will create a FestiveImageAdornmentTagger that will create IntraTextAdornmentTag where there are FestiveImageTag tags.

FestiveImageAdornmentTagger gets most of its logic by inheriting from IntraTextAdornmentTagger and specifies how to place a FestiveImageAdornment where there is a FestiveImageTag.

FestiveImageAdornment is just an Image with a bit of extra logic where we specify the image's path to use, which is done based on the length of the term.

This might seem complicated, but it allows functionality to be clearly separated into different classes.
In summary, the process works like this:

  1. The FestiveImageTaggerProvider tells Visual Studio to create a FestiveImageTagger for all text documents, and in turn, that will create FestiveImageTags.
  2. The FestiveImageTagger watches the changing text and adds a FestiveImageTag to each location in the document where we want to add an image.
  3. The FestiveImageAdornmentTaggerProvider tells Visual Studio to create a FestiveImageAdornmentTagger for all text documents and that will create tags of type IntraTextAdornmentTag where there are FestiveImageTags. (As created separately.)
  4. The FestiveImageAdornmentTagger creates (and updates) instances of FestiveImageAdornment within the document, in the location specified in the FestiveImageTag, and these are the displayed images.

The result of all this is that festive images will be added within the text of a document.

Visual Studio editor showing all the adornments created in this article


Practical uses of editor adornments

I have previously made several extensions (for more serious purposes) that use the techniques shown above. 

Real extensions using viewport adornments

These two extensions extend the editor by adding adornments to the viewport.

Show Selection

This extension displays the start and end positions of the current text selection in the top right-hand corner of the window.
The need to know this is niche but the ability to create an extension that displays this when needed, has saved hours of trying to manually determine how the location of specific points within a file.

Visual Studio editor window showing the selected position in the corner adornment

Get it from the Visual Studio Marketplace or view the source on GitHub.

Watermark

This extension allows the display of a customizable, text-based watermark on the editor. This is useful for ensuring that specific information (such as a name, URI, or email address) is always available to someone else viewing the screen. It is intended for use in demonstrations at conferences/meetups or while streaming. The content, size, colors, and position of the text are all configurable.
The watermark (my Twitter handle - @mrlacey) is highlighted in a red oval in the image below.

The Visual Studio editor showing a watermark

This extension is available from the Visual Studio Marketplace, and the code is on GitHub.

Real extensions using text-based adornments

These three extensions include f

Comment Links

This extension makes it possible to navigate between files of any type or language by placing a prefix of "Link:" before the filename in the comment. When this is done it adds a button that, when clicked, will navigate to that file. It can also jump to specific line numbers or instances of a specific piece of text within the file.
This was created to make it possible to easily navigate within projects that use different languages and so Visual Studio's built-in functionality for navigating to types doesn't work.

partial screenshot showing a button added into a comment

This extension is available from the Visual Studio Marketplace, and the code is on GitHub.

String Resource Visualizer

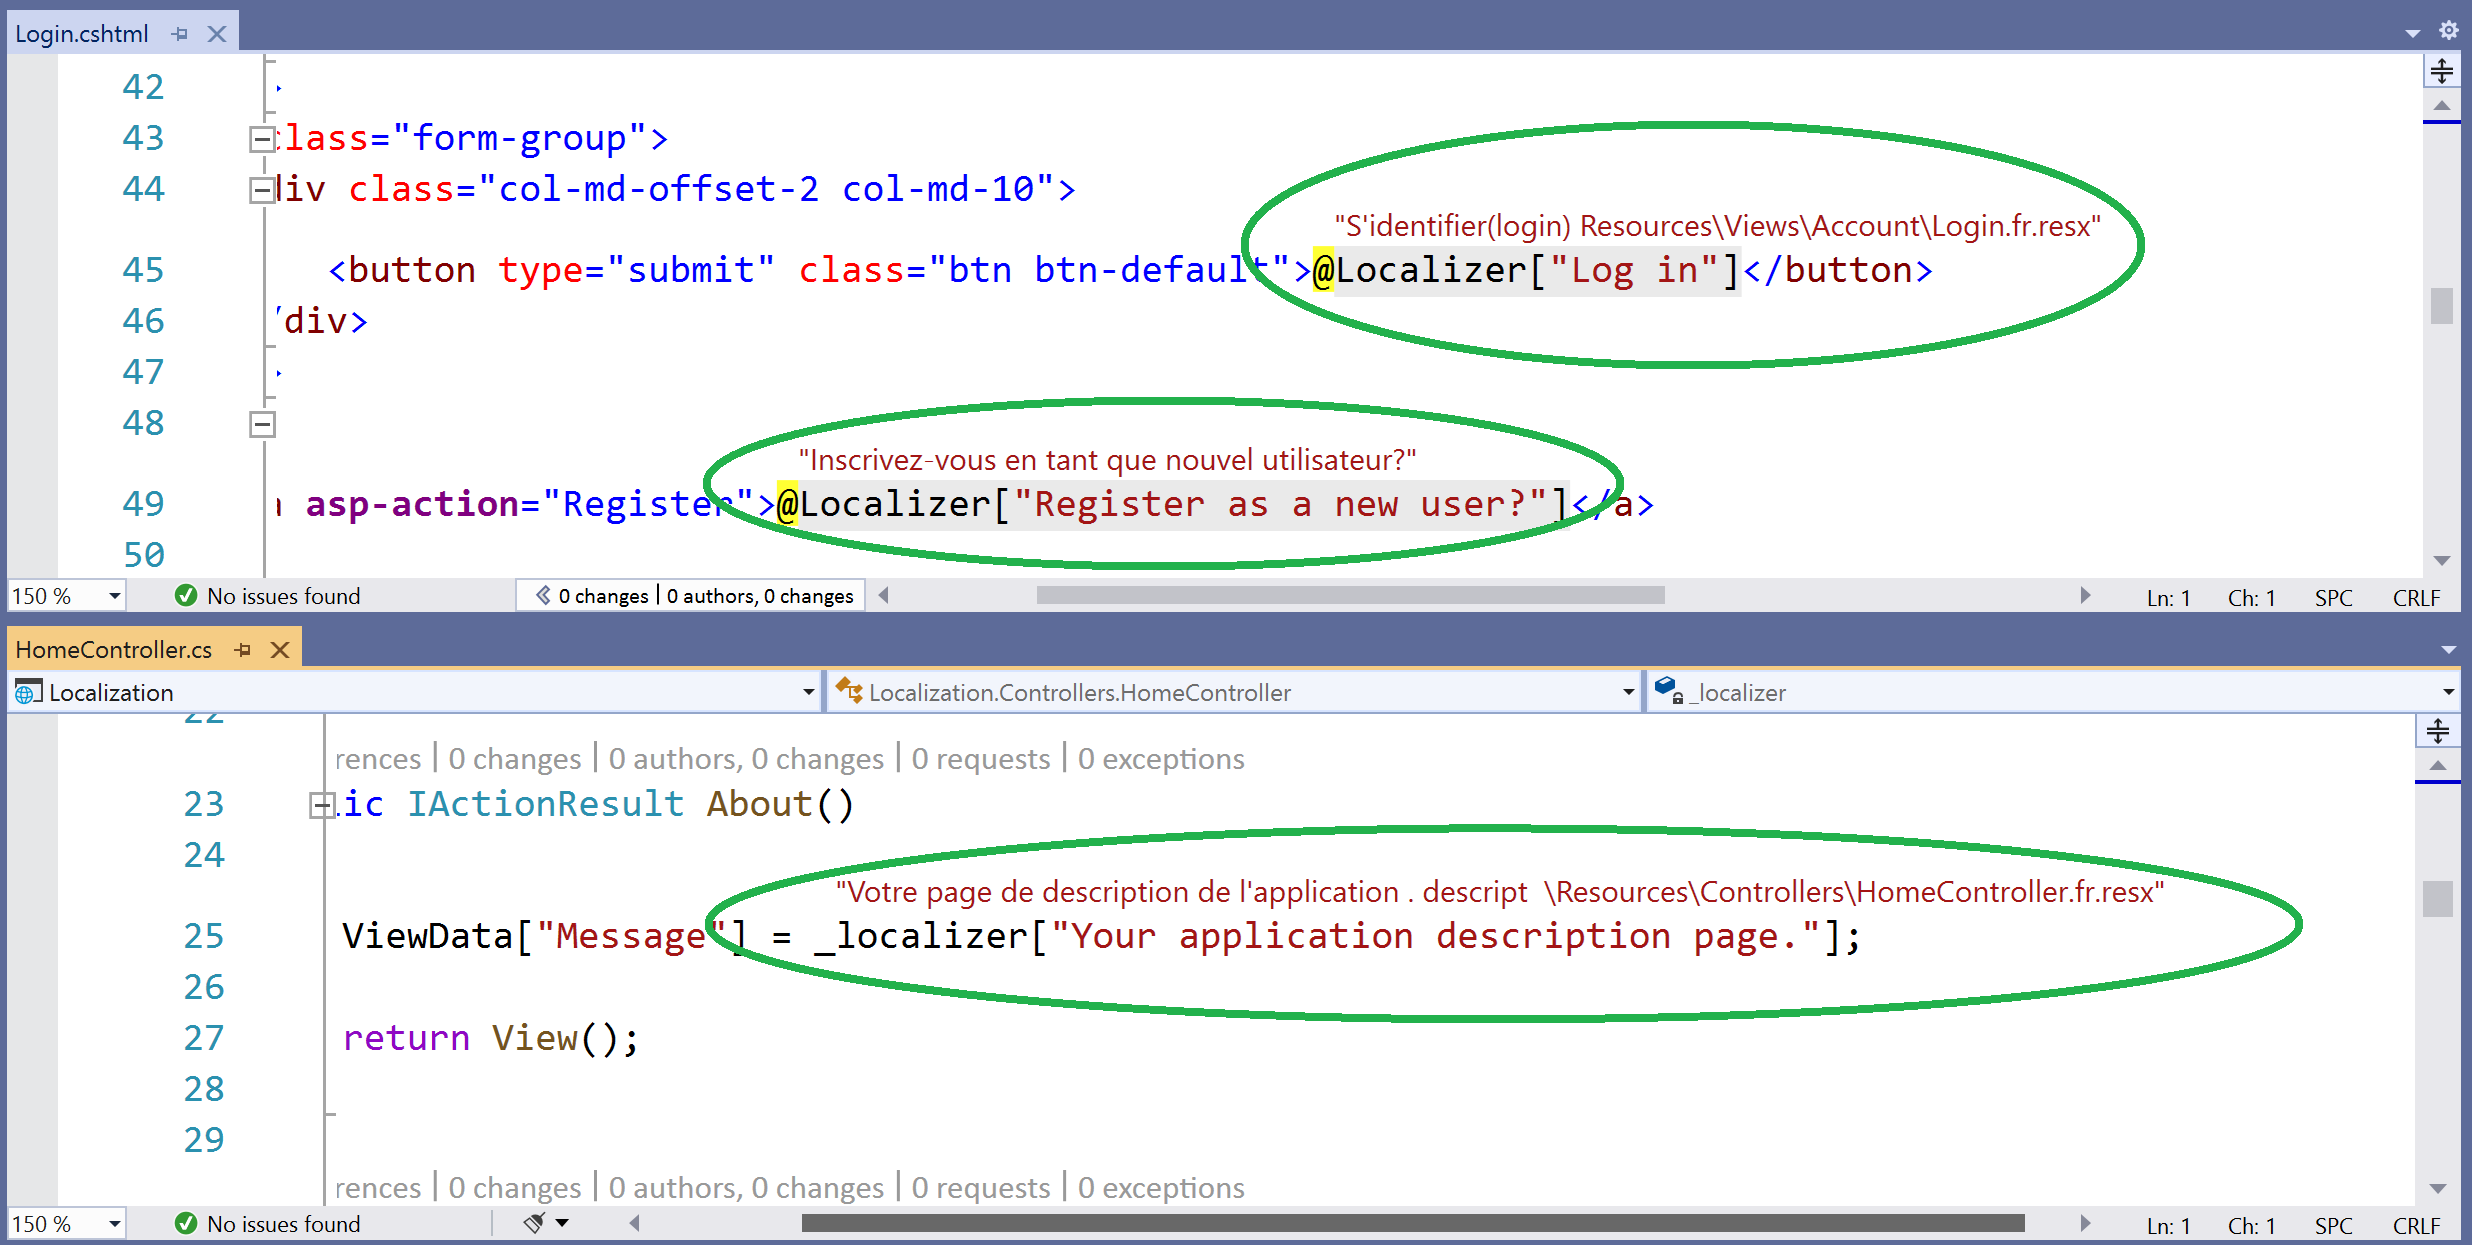
This extension displays the value of localized strings next to where they're used in source code. It works by identifying the use of values from a resource file (.resx or .resw) and displays the localized value above the usage. Configurable options support showing the default translation of that of a specific culture. This extension exists to help developers confirm that they are using the right value in the right place. It works with the ResourceManager and the ASP.NET Localizer.

This extension is slightly different from the above as it places the adornment above the text.

screenshot showing the values of string resources being displayed above where they're used

Examples of resources being shown when used via the ASP.NET Localizer

This extension is available from the Visual Studio Marketplace, and the code is on GitHub.

Const Visualizer

This is a companion extension to the String Resouce Visualizer. Rather than displaying resources, it displays the values of constants above the places where they're used.
This can be helpful to verify that the value of the constant you are using has the value you expect or intend.

screenshot showing examples of constants being displayed

This extension is available from the Visual Studio Marketplace, and the code is on GitHub.


Extending the Festive Editor code

There are lots of ways you can extend the above code. I've demonstrated a couple of examples in this video


Congratulations on making it this far. If you try extending or customizing this code for your own purposes I'd love to see the results. Share them in issues on GitHub or via Twitter.

If you're interested, you can find all the extensions I've made on the Marketplace.