Introduction to Samsung Galaxy Book 3 Ultra SSD
Samsung Galaxy Book 3 Ultra is a powerful laptop that features a 16-inch OLED display with high resolution, fast speeds, and the latest components. It’s equipped with an Intel Core i7-13700H CPU, Nvidia GeForce RTX 4050 GPU, at least 16GB of RAM, and 1TB of SSD.
It’s an ideal laptop for gaming and working. However, since the internal storage space is 1TB at most, you may run out of disk space quickly if you install many programs and games on the PC. Then what should you do when facing such an insufficient disk storage issue on your laptop?
Well, you can choose to delete the space-consuming and useless files to free up disk space. Besides, you can try to expand the laptop capacity by adding a second SSD drive as Galaxy Book 3 Ultra has 2 SSD slots. Of course, you can also try to perform a Samsung Galaxy Book 3 Ultra SSD upgrade to get more disk space.
All of them can help generate enough available space. Here, we’d like to recommend you replace the Galaxy Book 3 SSD with a larger one. It can not only give you more disk storage but also improve the PC’s performance. How to do a Galaxy Book 3 SSD upgrade? The following guide may help you out.
Galaxy Book 3 Ultra SSD Upgrade Guide
In this part, we discuss how to upgrade Galaxy Book 3 Ultra SSD step by step. Just read on.
Part 1: Before the SSD Upgrade
There are some essential prerequisites to upgrading the Galaxy Book 3 Ultra SSD:
- Buy a new SSD: This SSD should be large enough and compatible with the Galaxy Book 3 Ultra laptop.
- Prepare a SATA to USB cable: It’s used to connect the prepared SSD to the computer as an external drive.
- Prepare a suitable Phillips screwdriver: With it, you can open the computer case and remove the original SSD.
Part 2: Upgrade Galaxy Book 3 Ultra SSD Without Reinstalling OS
After preparing everything for the Galaxy Book 3 Ultra SSD upgrade, you may wonder how to finish the operation without reinstalling Windows. As for this, you can make use of a piece of disk cloning software. MiniTool Partition Wizard is a great choice.
This professional system migrator enables you to transfer your Windows from the original drive to the new SSD easily and effectively with its Migrate OS to SSD/HD feature.
Besides, it also allows you to create/resize/copy/delete partitions, format USB to FAT32/NTFS/exFAT, convert MBR to GPT without losing data, recover data from hard drive, and more.
Now, let’s learn how to use MiniTool Partition Wizard to upgrade the Galaxy Book 3 Ultra SSD without reinstalling Windows from the following content.
Step 1: Use the SATA to USB cable to connect the new SSD to your computer.
Step 2: Download and install MiniTool Partition Wizard on your PC. Then launch this program to get into the main interface.
MiniTool Partition Wizard DemoClick to Download100%Clean & Safe
Step 3: Select Migrate OS to SSD/HD Wizard from the left action panel.
Step 4: In the pop-up window, choose an option to migrate the OS based on your needs. Then click Next.

Step 5: In the next window, select the new SSD and click Next. When prompted, click Yes to continue.
Step 6: After that, choose the desired copy options and click Next.
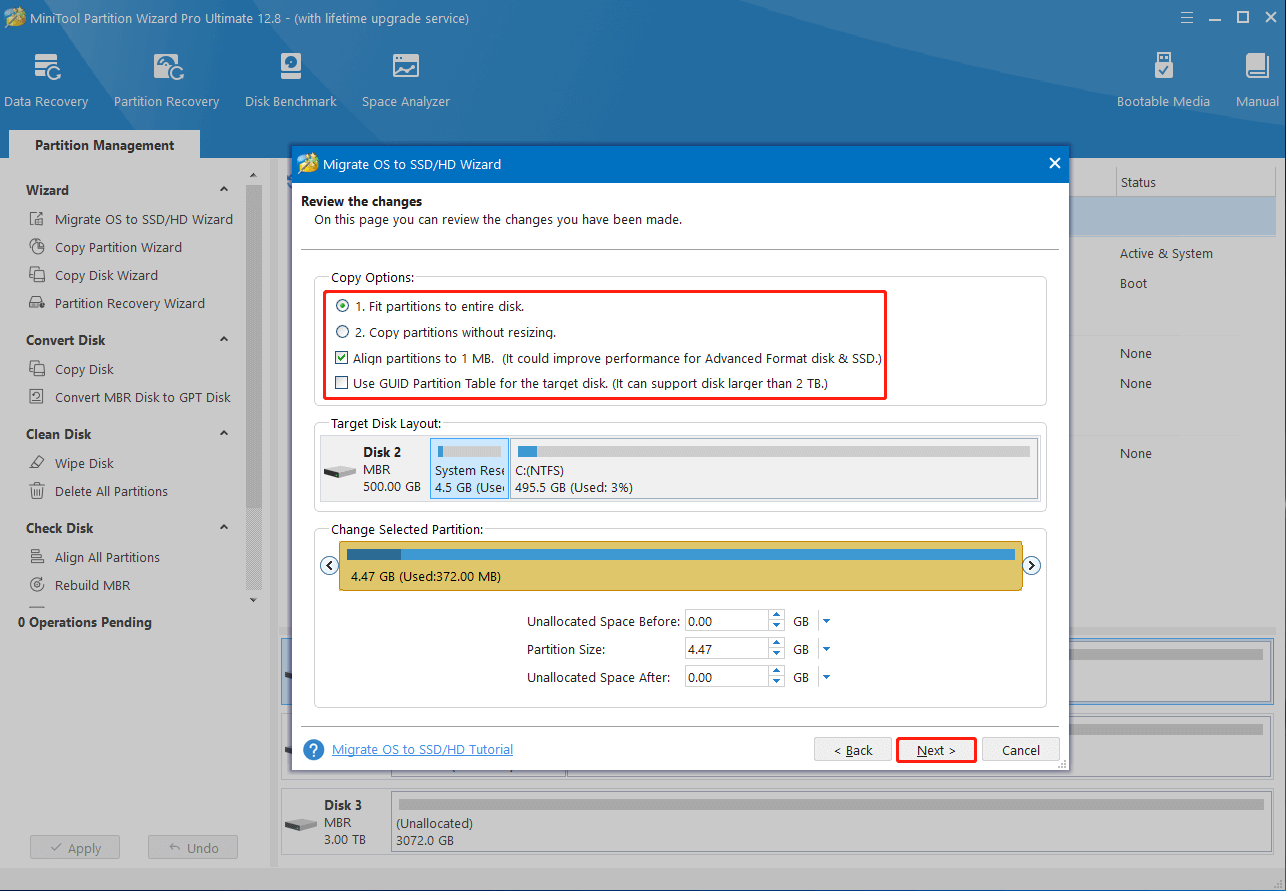
Step 7: Finally, click Finish and Apply to save the pending operation.
Part 3: Replace Your Samsung Galaxy Book 3 SSD
Once you finish migrating the operating system to the new SSD, disconnect it from your computer and shut down the system. Then follow the given steps to finish the Galaxy Book 3 SSD upgrade.
Step 1: Place the Samsung Galaxy Book 3 Ultra bottom side up on the table.
Step 2: Use the screwdriver to unscrew the screws carefully. Then remove the bottom cover properly.
Step 3: Remove the screw that secures the SSD and then take the SSD out carefully.
Step 4: Slide in the new SSD and fasten it with the right screw. Then place back the bottom cover.
Bottom Line
This post shows you detailed information about the Samsung Galaxy Book 3 Ultra SSD upgrade. When you plan to upgrade your SSD, you can refer to this post. If you get stuck in any issues while using MiniTool Partition Wizard, please feel free to contact us via [email protected]. We’ll reply to you as soon as possible.