Deploy Multiple Applications
Contents
Deploy Multiple Applications#
In Ray 2.4+, deploying multiple independent Serve applications is supported. This user guide walks through how to generate a multi-application config file and deploy it using the Serve CLI, and monitor your applications using the CLI and the Ray Serve dashboard.
When to Use Multiple Applications#
With the introduction of multi-application Serve, we walk you through the new concept of applications and when you should choose to deploy a single application versus multiple applications per cluster.
An application consists of one or more deployments. The deployments in an application are tied into a direct acyclic graph through model composition. An application can be called via HTTP at the specified route prefix, and the ingress deployment handles all such inbound traffic. Due to the dependence between deployments in an application, one application is a unit of upgrade.
With that in mind, if you have many independent models each behind different endpoints, and you want to be able to easily add, delete, or update these models, then you should use multiple applications. Each model should then be deployed as a separate application. On the other hand, if you have ML logic and business logic distributed among separate deployments that all need to be executed for a single request, then you should use model composition to build a single application consisting of multiple deployments.
Get Started#
Define a Serve application:
from ray import serve
from ray.serve.handle import RayServeDeploymentHandle
from ray.serve.drivers import DAGDriver
from ray.serve.deployment_graph import InputNode
from ray.serve.http_adapters import json_request
@serve.deployment
class Adder:
def __call__(self, input: int) -> int:
return input + 2
@serve.deployment
class Multiplier:
def __call__(self, input: int) -> int:
return input * 2
@serve.deployment
class Router:
def __init__(
self,
adder: RayServeDeploymentHandle,
multiplier: RayServeDeploymentHandle,
):
self.adder = adder
self.multiplier = multiplier
async def route(self, op: str, input: int) -> int:
if op == "ADD":
return await (await self.adder.remote(input))
elif op == "MUL":
return await (await self.multiplier.remote(input))
with InputNode() as inp:
operation, amount_input = inp[0], inp[1]
multiplier = Multiplier.bind()
adder = Adder.bind()
router = Router.bind(adder, multiplier)
amount = router.route.bind(operation, amount_input)
app = DAGDriver.options(route_prefix="/calculator").bind(
amount, http_adapter=json_request
)
Copy this to a file named calculator.py.
Define a second Serve application:
from ray import serve
from ray.serve.drivers import DAGDriver
from ray.serve.deployment_graph import InputNode
from ray.serve.http_adapters import json_request
@serve.deployment
def greet(name: str):
return f"Good morning {name}!"
with InputNode() as name:
greeter = greet.bind(name)
app = DAGDriver.options(route_prefix="/greet").bind(greeter, http_adapter=json_request)
Copy this to a file named greet.py.
Generate a multi-application config file that contains both of these two applications and save it to config.yaml.
serve build --multi-app calculator:app greet:app -o config.yaml
This generates the following config:
proxy_location: EveryNode
http_options:
host: 0.0.0.0
port: 8000
applications:
- name: app1
route_prefix: /calculator
import_path: calculator:app
runtime_env: {}
deployments:
- name: Multiplier
- name: Adder
- name: Router
- name: DAGDriver
- name: app2
route_prefix: /greet
import_path: greet:app
runtime_env: {}
deployments:
- name: greet
- name: DAGDriver
Note
The names for each application are auto-generated as app1, app2, etc. To give custom names to the applications, modify the config file before moving on to the next step.
Deploy the Applications#
To deploy the applications, be sure to start a Ray cluster first.
$ ray start --head
$ serve deploy config.yaml
> Sent deploy request successfully!
Query the applications at their respective endpoints, /calculator and /greet.
>>> requests.post("http://localhost:8000/calculator", json=["ADD", 5]).json()
7
>>> requests.post("http://localhost:8000/greet", json="Bob").json()
'Good morning Bob!'
Tip
If you prefer to use cURL to ping these endpoints, add the -L flag. The DAGDriver does an HTTP redirect, and the flag ensures that cURL follows the redirect:
curl -L -X POST -H "Content-Type: application/json" -d '["ADD", 5]' localhost:8000/calculator
Check Status#
Check the status of the applications by running serve status.
$ serve status
name: app1
app_status:
status: RUNNING
message: ''
deployment_timestamp: 1679969226.923282
deployment_statuses:
- name: app1_Multiplier
status: HEALTHY
message: ''
- name: app1_Adder
status: HEALTHY
message: ''
- name: app1_Router
status: HEALTHY
message: ''
- name: app1_DAGDriver
status: HEALTHY
message: ''
---
name: app2
app_status:
status: RUNNING
message: ''
deployment_timestamp: 1679969226.923282
deployment_statuses:
- name: app2_greet
status: HEALTHY
message: ''
- name: app2_DAGDriver
status: HEALTHY
message: ''
Note
Notice that in the output of serve status, the prefix of each deployment name is the application name. At runtime, all deployments will have their corresponding application prepended to their names.
Inspect Deeper#
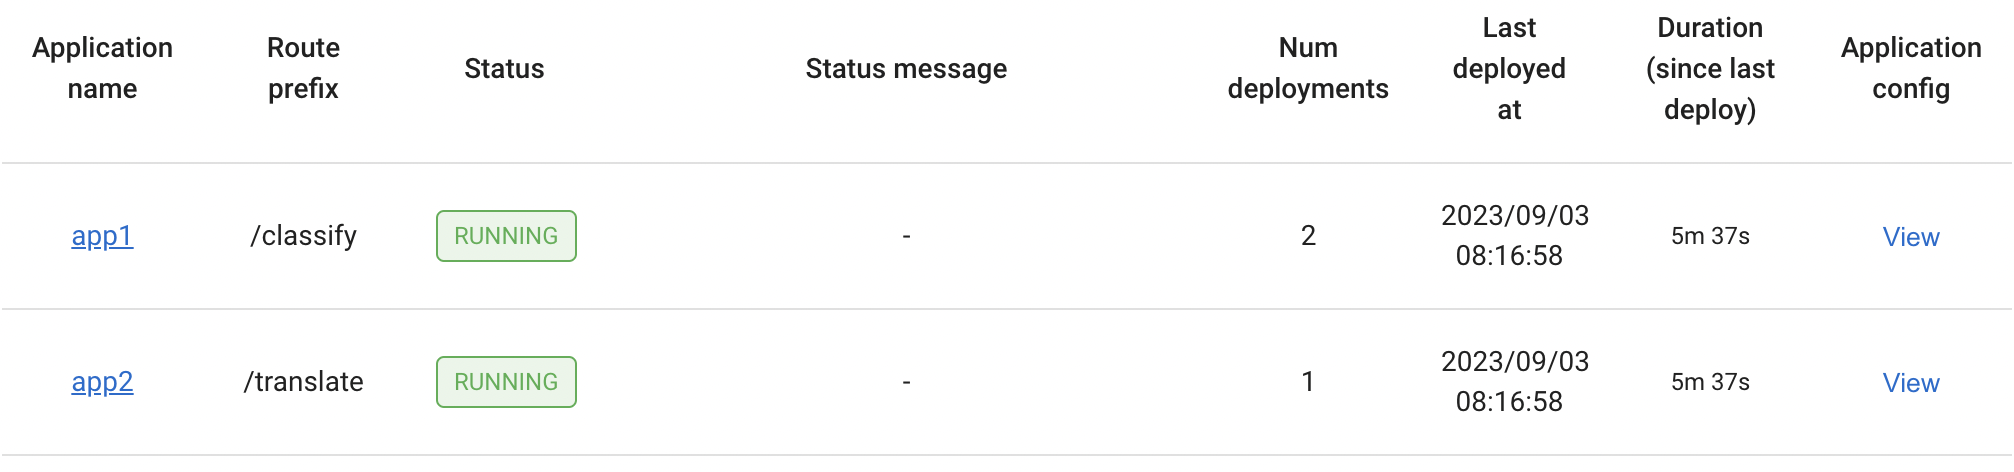
For more visibility into the applications running on the cluster, go to the Ray Serve dashboard at http://localhost:8265/#/serve.
You can see all applications that are deployed on the Ray cluster:
The list of deployments under each application:
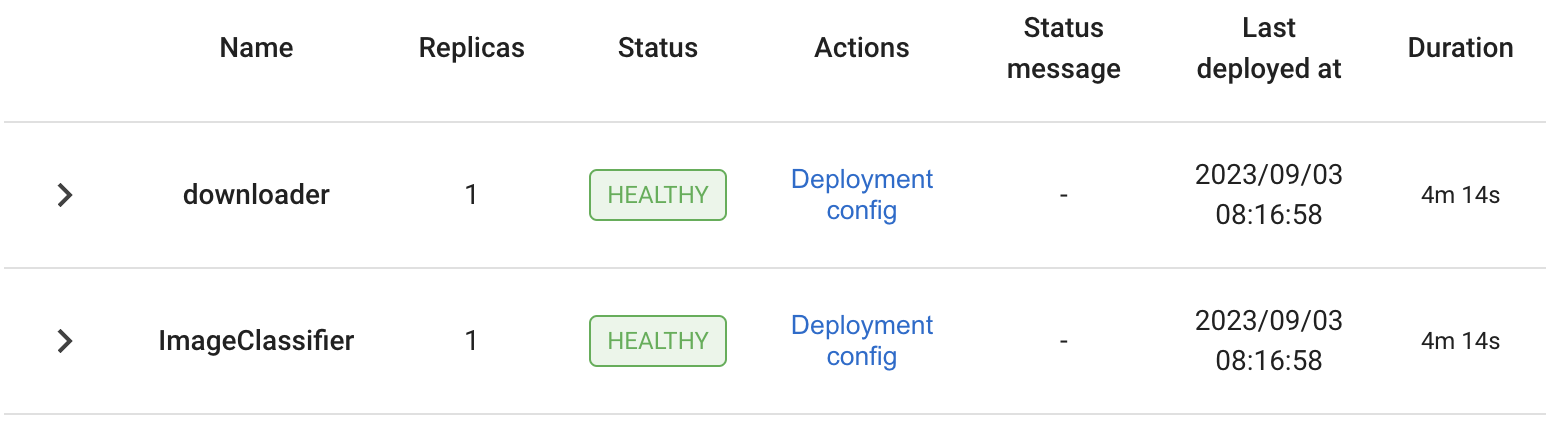
As well as the list of replicas for each deployment:

For more details on the Ray Serve dashboard, see the Serve dashboard documentation.
Development Workflow with serve run#
You can also use the CLI command serve run to run and test your application easily, either locally or on a remote cluster.
$ serve run config.yaml
> 2023-04-04 11:00:05,901 INFO scripts.py:327 -- Deploying from config file: "config.yaml".
> 2023-04-04 11:00:07,505 INFO worker.py:1613 -- Started a local Ray instance. View the dashboard at http://127.0.0.1:8265
> 2023-04-04 11:00:09,012 SUCC scripts.py:393 -- Submitted deploy config successfully.
You can then query the applications in the same way:
>>> requests.post("http://localhost:8000/calculator", json=["ADD", 5]).json()
7
>>> requests.post("http://localhost:8000/greet", json="Bob").json()
'Good morning Bob!'
The command serve run blocks the terminal, which allows logs from Serve to stream to the console. This helps you test and debug your applications easily. If you want to change your code, you can hit Ctrl-C to interrupt the command and shutdown Serve and all its applications, then rerun serve run.
Note
serve run only has support for running multi-application config files. If you want to run applications directly without a config file serve run can only run one application at a time.
Adding, Deleting, and Updating Applications#
The config submitted to the cluster describes the target state for Ray Serve. Consequently, Ray Serve will add, remove, or update based on the list of applications in the config and the config options set for each application.
To add an application, add a new entry under the
applicationsfield.To delete an application, remove the corresponding entry under the
applicationsfield.To update an application, modify the config options in the corresponding entry under the
applicationsfield.
Note
The update behavior for each application when a config is resubmitted is the same as the old single-application behavior. For how an application reacts to different config changes, see Updating a Serve Application.
New Multi-Application Config#
Use the config from the above tutorial as an example. In a multi-application config, the first section is for cluster-level config options:
proxy_location: EveryNode
http_options:
  host: 0.0.0.0
  port: 8000
Then, specify a list of applications to deploy to the Ray cluster. Each application must have a unique name and route prefix.
applications:

- name: app1
  route_prefix: /calculator
  import_path: calculator:app
  runtime_env: {}
  deployments:
  - name: Multiplier
  - name: Adder
  - name: Router
  - name: DAGDriver

- name: app2
  route_prefix: /greet
  import_path: greet:app
  runtime_env: {}
  deployments:
  - name: greet
  - name: DAGDriver
Migrating from a Single-Application Config#
Migrating the single-application config ServeApplicationSchema to the multi-application config format ServeDeploySchema is straightforward. Each entry under the applications field matches the old, single-application config format. To convert a single-application config to the multi-application config format:
Copy the entire old config to an entry under the
applicationsfield.Remove
hostandportfrom the entry and move them under thehttp_optionsfield.Name the application.
If you haven’t already, set the application-level
route_prefixto the route prefix of the ingress deployment in the application. In a multi-application config, you should set route prefixes at the application level instead of for the ingress deployment in each application.When needed, add more applications.
For more details on the multi-application config format, see the documentation for ServeDeploySchema.
Note
You must remove host and port from the application entry. In a multi-application config, specifying cluster-level options within an individual application isn’t applicable, and is not supported.